
ACG Access, also known as MeetMax, allows participants to see who’s attending, request and confirm meetings, and connect with key dealmakers from across the country before and during the event.
As of October 9th, the Scheduling Software is OPEN to all attendees. Please note, we will add new attendees within 2-3 days of registering.
ACG Access, the MeetMax scheduling tool, allows participants to see who’s attending, request and confirm meetings, and connect with key dealmakers from across the country before and during the event.
Please email: enduser-support@meetmax.com with any questions on using the tool and brooke@acgflorida.com for any changes to your information.
Logging In
- You will receive an email from acgflorida@acg.org to log in when ACG Access launches. Click the “login” button displayed at the bottom of the email.
- Personalized login information will auto-populate within the username and password fields.
- Click “Login”.
- If you do not know the email you registered with, please reach out to brooke@acgflorida.com
Profile & Demographics
- Once you log in, you will arrive at the Home Dashboard.
- Click the “my account” button on the dashboard to update your personal information and notification options. Click “Submit” to save all changes.
- Once you have confirmed your account details, click the “Your Profile” button. If you have changes you would like to make to your demographic responses, please update.
- After updating, scroll down and select “Submit”. You may also preview how your profile appears, by clicking the “View Profile” button located at the top-right of this section.
Event Schedule - Your Calendar & Black Out Times (IMPORTANT)
- Before you begin requesting or accepting meetings, please be sure to ADD events to your calendar (i.e., breakfast speaker, keynote lunch, breakout session, etc.), so that the software blocks those times for meeting requests.
- You can do so by clicking the + sign next to a program/event you want to attend. See Sample below:

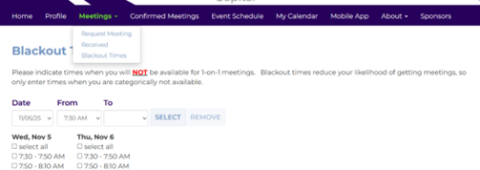
- You can also blackout times so that the software does not schedule meetings then. You may have a phone call or just need a break.

Meeting Calendar
- This section is where you can see all of your confirmed meetings and manage your overall schedule.
- You can view and edit your meetings by clicking on any event/meeting and clicking the edit button
- If you would like to delete the event/meeting, click the meeting and select “Cancel”. You will be given the option to select a reason for cancelling and/or add a note. Click “Submit”.
- To change a confirmed meeting time or location, click on the meeting and select the “Edit” button. You will then be allowed to update the meeting duration, time, and/or location. Click “Submit”.
- To download your meetings: click Export Calendar in the top right corner of the page. Follow the instructions provide on the “Export Calendar” page for the type of calendar used.
Attendee List & Requesting Meeting
- Select “attendees” on the Home Dashboard at the top of the page and click “Request Meeting” to search and filter the attendee list to find who you would like to meet. To learn more about a user, click their name and a pop-up will display containing all the information they provided.
- To request a meeting, find the individual you would like to request and select “Request”.
- You are able to select a time to meet upfront – if the participant confirms your meeting request, they can keep the requested time selected or will view days & times you are both mutually available.
- The individual who confirms the meeting will be able to select the table location for the meeting.
- Once you have sent the invite, the status will be “pending”.
- To ACCEPT a request, click “Received Requests” and select ACCEPT. A pop-up box will appear that will allow you to choose a mutually available time and a location.
- Private Equity/Family Office/Investment Banker Exhibitors and Sponsors have a table # assigned to them. All general attendees can choose their location if available or one of our “Attendee Lounges” as the location.
- The meeting will automatically be added to your calendars.
- If you want to DECLINE a meeting request, click on the dropdown arrow to the right of ACCEPT and select DECLINE. That request will be moved to the “declined requests” tab. You can undo any declined requests at any point.

Register by January 14 to lock in the lowest rate and join 3,200+ dealmakers in Las Vegas on April 27-29, 2026.
